Price range: $8.00 through $32.00
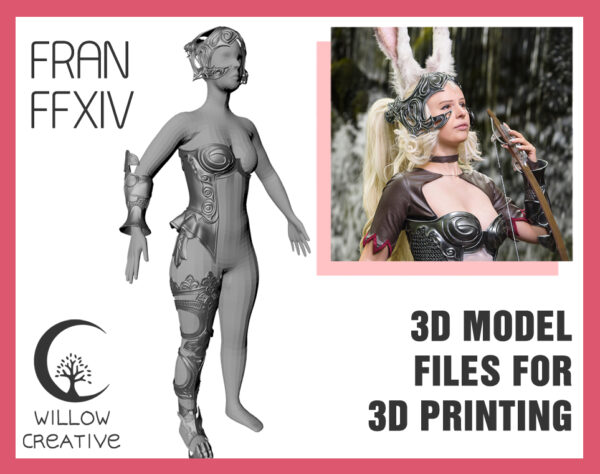
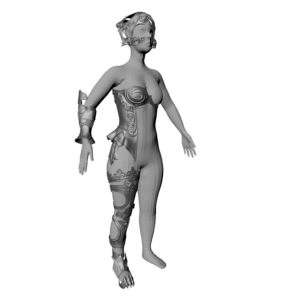
STL 3d models of the helmet, armor, shoes, bow and arrow for Fran, from Final Fantasy, to be 3D printed for cosplay. Closely referenced from her outfit in Final Fantasy 14 expansion, these can also be used for the female Viera starter set in FFXIV. The details are slightly different from her appearance in Final Fantasy 12.
The STL files are ready to print with default settings and are scaled to S/M female size.
Choice of files:
Heels only: Includes files for creating the shoes as seen here. Designed to fit platform stilettos with approx. 1.5 to 2inch platform and 5 to 6 inch heels.
Complete set: Includes all stl files to create only the 3dprinted details for complete Fran outfit plus some helpful flat printable patterns for the thighs. Now includes customized STL files for TPU printing, using the same supports I used for my TPU version.
Description
STL 3d models of the helmet, armor, bow and arrow for Fran, from Final Fantasy, to be 3D printed for cosplay. Closely referenced from her outfit in Final Fantasy 14 expansion, these can also be used for the female Viera starter set in FFXIV. The details are slightly different from her appearance in Final Fantasy 12.
The STL files are ready to print with default settings and are scaled to S/M female size. You may need to cut some pieces if they are too big for your 3D printer.
The following design-adjustments are made so the armor can be worn properly: There’s an extra groove designed in the ankle pieces and wrist pieces, to be cut after printing, otherwise the pieces will not fit over your feet/hands.
Files included for heels only choice:
Toe pieces
Twin heel
Top shoe cover
Designed to fit platform stilettos with approx. 1.5 to 2inch platform and 5 to 6 inch heels.
You need to remove the original heels to replace with twin heel if desired.
Files included for complete set choice:
Helmet
Ponytail clip
Arm cuffs
Elbow pieces
Bodice half
Bodice half (without the skirt edge)
Bodice closure piece
Spine decoration
Shoulder decoration
Hip decoration
Thigh armor
Thigh armor back decoration piece
Knee pieces
Shin pieces
Ankle pieces
Right shoe instep piece
Toe pieces
Twin heel for 5.5 to 6 inch platform heels
Bow decorative metal parts (you need to make a base bow)
Arrowhead and nock (suitable for 6mm rod)
Chainmail
Additional supportive patterns: Loincloth, skirt and thigh (if foam/lasercut).
Printing instructions:
I printed my armor using the Peopoly Phenom resin printer, with a 50-50 mix of SirayaTech Tenacious resin and SirayaTech Fast Grey resin (25 or 30% tenacious will work well too).
You may also print this armor using a standard FDM/FFF 3d printer, but this armor is quite tricky so I recommend using slow speed (50mms), a high quality printer (or one properly calibrated) and sturdy support settings. Having atleast 5 to 10 walls is recommended, you don’t have to worry much about weight due to how thin the armor is.
Additional suggested print settings for FDM/FFF printers: 0.2mm layer height, supports zigzag/grid (everywhere) at minimum 10%, z-hop setting enabled, raft or brim. Consider increasing your flow to 105% and up your temperature +5C from standard, to make sure that each layer fuses better for a stronger result. Print each piece as straight up possible for the best resolution results.
Finishing instructions:
After removing the supports, fit the armor to your own body and shoes, using a heatgun if necessary (shape the soft and hot armor while wearing tight clothes to prevent burns!).
To fit the ankle pieces and arm cuffs, cut through one of the channels on the back using a multitool. You can do the same to the shin pieces if they do not fit over your feet.
To fit the bodice, I glued a zipper (with extra fabric sewn to both sizes) to connect the back of each half. The front closure piece was glued in with elastic bands, so you can rotate and stretch the bodice around yourself when putting it on.
Sand your 3D prints using 100-150 grit sandpaper, with royal use of primer or filler spray inbetween to get a smooth surface. Use higher grits for an even smoother surface. When you’re satisfied with the results, your last layer should be a primer spray, before painting it with acrylics (or any other paint, such as oil paints or spray paints). Protect your paint with a varnish spray in satin or gloss. I used duplicolor metallic grey acrylic spray paint for my armor, and silver metallic wax to accentuate the highlights.
You can also use epoxy resin such as XTC3D, SHIELD (by Poly-Props), epoxacoat or other epoxy to smooth and strengthen your 3d print with less effort than sanding it. Keep in mind epoxy resin is toxic and read the safety card and instructions included carefully.
For the bodice, the chainmail was printed separately on my large resin printer then glued to the bodice afterwards. I recommend using mesh fabric or other type of mesh if you don’t have this option, because you cannot print the chainmail very well on an FDM printer. Cut the mesh to size, glue it to your bodice, and highlight it using silver paint after painting. It’ll look just like chainmail!
You can get FDM chainmail meant to be printed in flexible filament here: https://willowcreativ.com/download/chainmail-stl-for-fdm-printers/
To fasten your armor, use elastic bands or nylon bands with superglue, hotglue or contact cement. Roughen the spots with sandpaper before you glue your fasteners. Glue a piece of felt or fabric to a wig comb, and glue it to your ponytail clip to be able to slide it into your wig.
The knee pieces and elbow pieces need to be glued to the shin pieces and arm cuffs respectively. I use superglue with superglue activator to glue all my 3D print pieces.
The 3d models are made by me. Because my website does not allow stl file extensions, the files are packed in a zip folder. This can be unpacked by most operating systems without the need of additional applications into your useable STL files, using the right-click menu.
License information: You may not share, change and share, sell the digital files or massively sell 3D prints made with it. You may use the files for personal use and single-use commissions only. Attribution must be given atleast once when your project is made using these files: mention Willow Creative in your project description.
Disclaimer: Any rights are reserved for Square Enix. This is a fanmade item, I am not in any way an official reseller or licensed by the relevant IP owners

Additional information
| Choice | Heels only, Complete set |
|---|
